How we overhauled our end-to-end testing to improve speed, reliability, and developer experience

At Rippling we’ve built one of the most extensive workforce management platforms out there—maybe the most extensive. And with the recent addition of Finance Cloud to our considerable portfolio of HR and IT products, we’re not slowing down. Today, we have 600+ developers, across more than six time zones, contributing to our codebase.
Because of our size and speed, we follow trunk-based development, where we merge small but frequent updates to master, which is assumed to always be stable, without issues, and ready to deploy. To support this, we built a fast, efficient, and reliable diagnostic system that runs quality checks on every PR and gatekeeps the build's stability and integrity.
Updating our end-to-end testing workflow
In the past, one of the most important parts of this system was our suite of end-to-end (E2E) tests using Selenium and WebdriverIO (running tests with WDIO and the ‘selenium-standalone’ package for setting up the server and required drivers).
Rippling internally powers 30+ products. As we started writing more tests, increasing the coverage over our products and reaching around 500 tests within a span of nine months, we found that it took nearly two hours to run the whole test suite with our E2E configuration. More than 20% of the build failures were because of flaky tests. It was becoming increasingly difficult for developers to author, execute, and debug tests. So we decided to update the workflow and explore other E2E solutions. After gathering and documenting the requirements, exploring possible solutions, and creating pros-and-cons lists, we decided to go with the Playwright library for testing and a database restore methodology for seeding test data.
During our initial comparison analysis, we observed that these steps could reduce our test run durations by as much as 40%. Going forward, we set ourselves two objectives:
- Deliver an impeccable developer experience at each step of a test’s lifecycle (authoring, execution, debugging, and reporting).
- Provide a reporting solution that would allow anybody at Rippling (in and outside Engineering) to understand exactly which user flows are being tested and monitored.
Authoring and execution of tests
One of the first decisions we made was to use TypeScript, for static type-checking, readability, and better auto-complete support. We also included the test files in our code quality checks (linting, formatting, etc.).
Playwright test generator helped accelerate adoption for developers who were new to E2E testing. They could generate the test code from the interactions on the frontend app, clean it, and introduce it as a test flow.
For most tests, we needed to set up some data as a prerequisite. For example, to sign in as an employee, we had to first set up a company and then add the employee. We used to do this via multiple API calls before a test, and this was needed for every execution of every test. But this had increased our overall test run duration, with around 50% of the test run duration taken up for seeding the data for the test, and also the seed APIs were another point of failure for the tests.
So we moved to a Database restore methodology, where the data snapshot required for all tests is generated beforehand and restored into the Database before the test run starts. This not only reduced our test run duration but also removed the dependency on seed APIs.
For the pages or scenarios with golden expectations, we use screenshot testing. To normalize the platform (screenshots differ between browsers and platforms due to different rendering, fonts, etc.), we use the Playwright-Docker integration to take screenshots.
Next, we added READMEs documenting the workflow, best practices (sample tests, folder structure, tagging, etc.), FAQs, common gotchas, and channels to reach out to for support. Another company might have documented this workflow on a page buried in a wiki. But this is Rippling—we have a Learning Management System (LMS), which helps our customers train employees on everything from compliance to internal processes. So, to introduce new engineers to this workflow, we added it to our frontend onboarding program in Rippling LMS.
Debugging and reporting
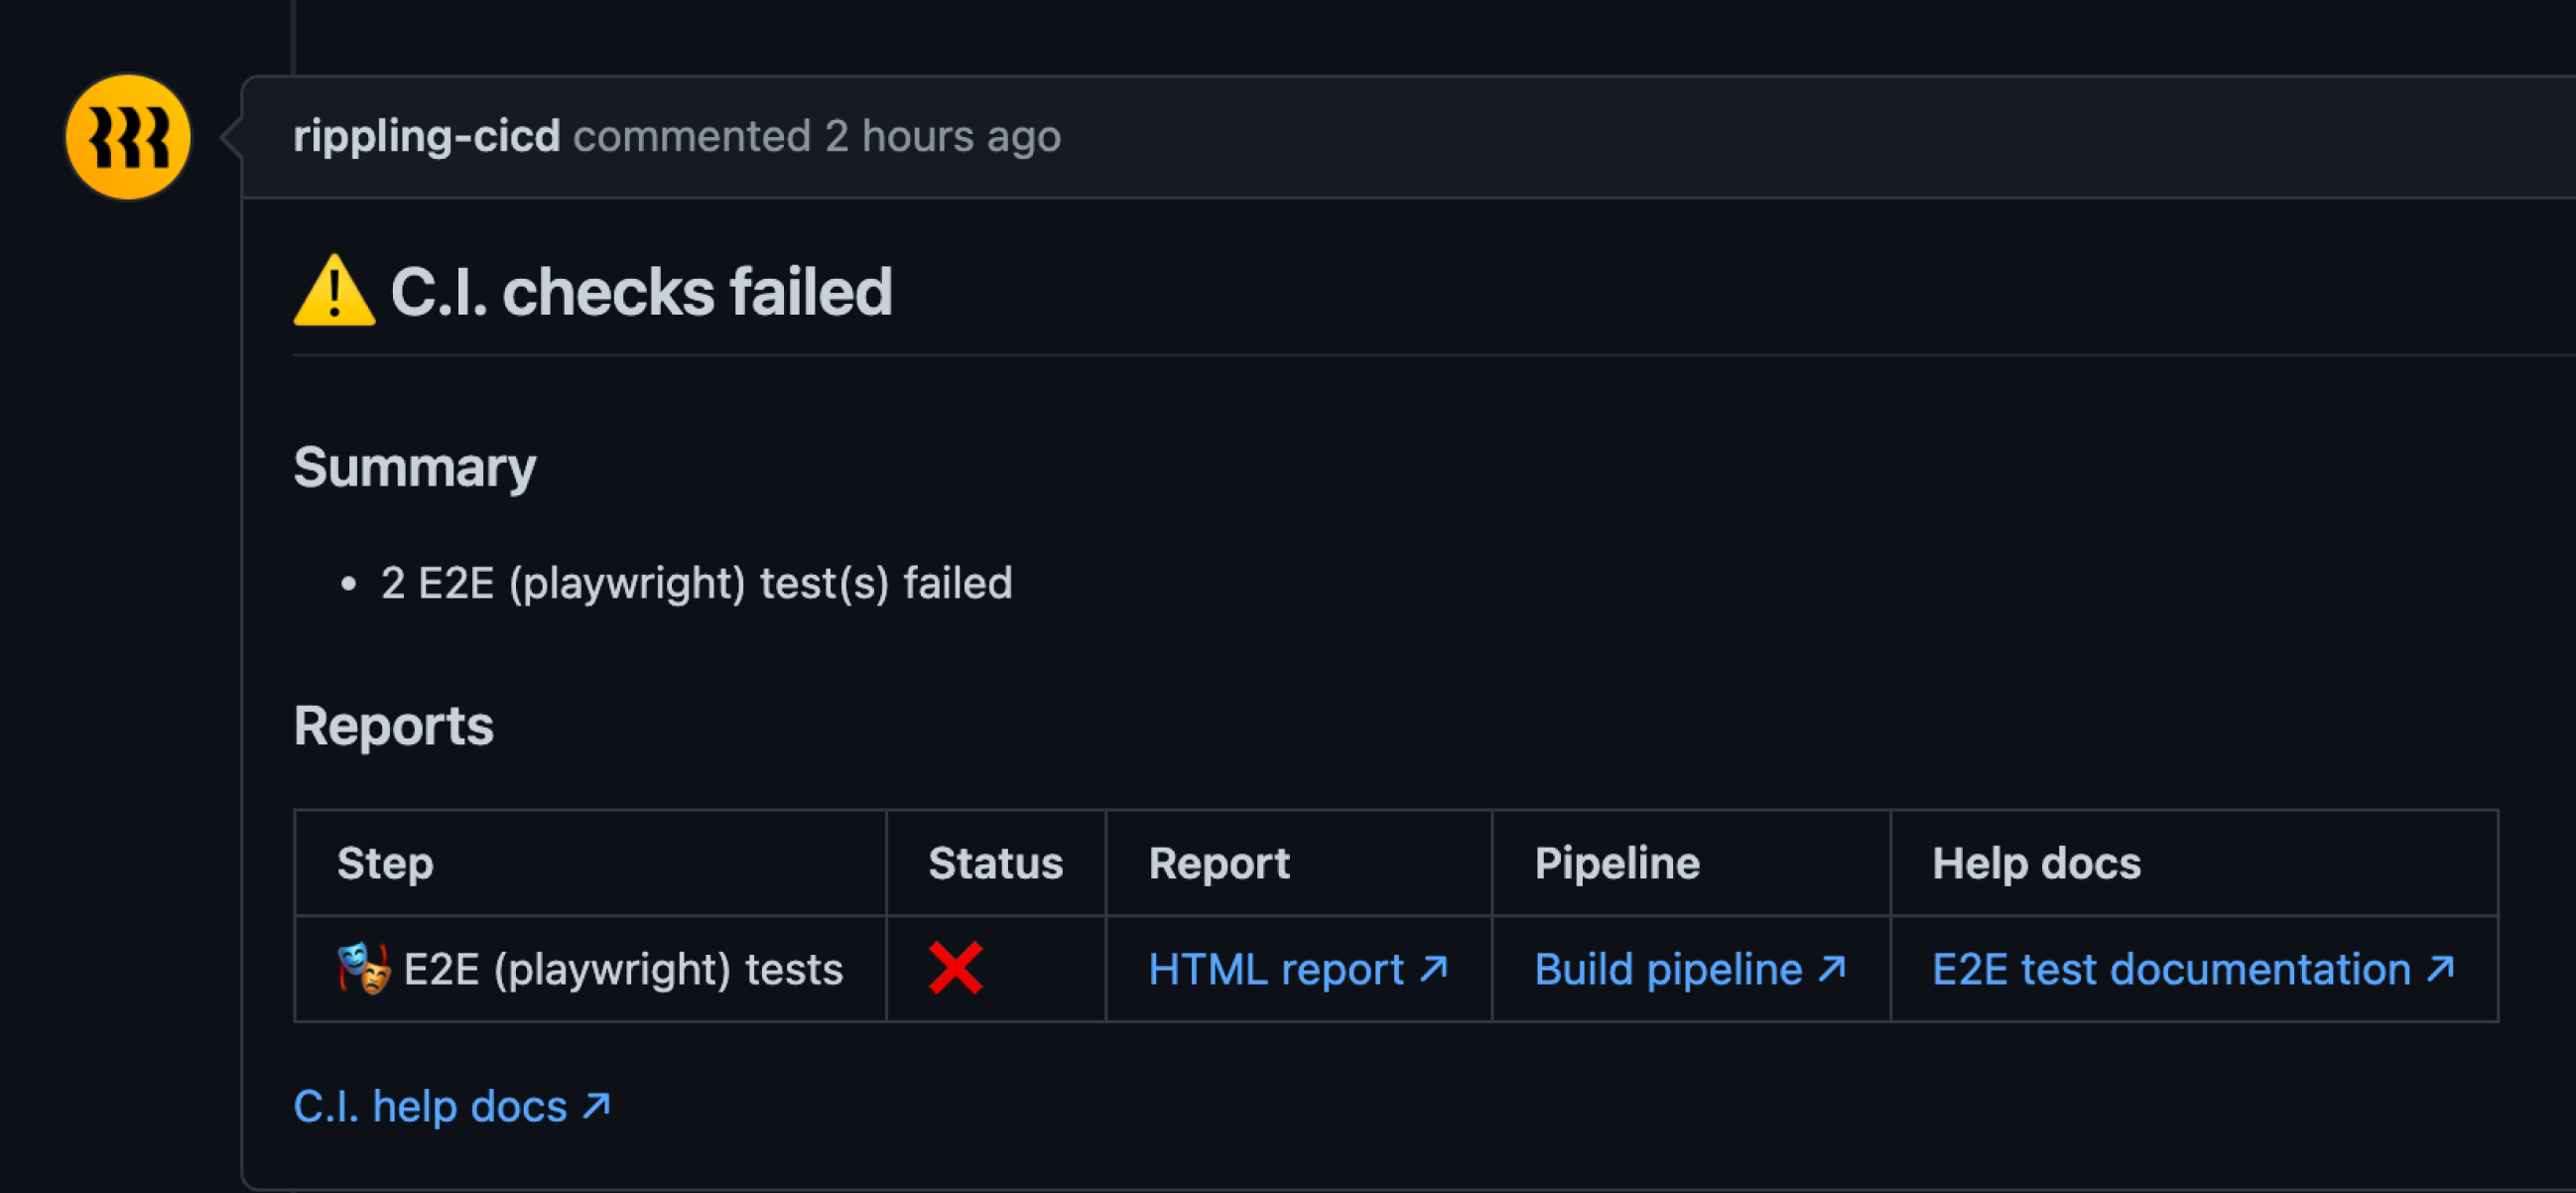
In the event of any test failure, we wanted to provide rapid visibility into how the changes affected the failing test(s). With Playwright, we were able to generate and share HTML reports with screenshots, video playback, and test traces for all the test runs. We also created playbooks on advanced debugging methods and sections on common failure scenarios (e.g. quick redirection logic leads to chrome aborting JS build downloads).
In case of test failures on the Continuous Integration (CI)
- On a pull request, we add the HTML report link on the PR as a comment and also notify the PR owner via Slack.
- On a master branch check, we notify on the #frontend Slack channel with the HTML report link, tagging the relevant stakeholders based on which tests failed.

Reports for everyone
We also created a dashboard where we list all the tests that are on master, provide additional details (like the module the tests belong to), define the directly responsible individual, and also link to a video recording of the test (generated using Playwright), so that it is easier for non-technical teams, like Product and Design, to view the tests in action. We were also able to track slow and flaky tests better with this dashboard.
Efficient test execution on CI
Test selection
We wanted to detect and run only the relevant tests based on the files changed in the pull request. We also wanted developers to be able to define which tests to run when specific files had changes.
Let’s look at a simplified implementation of test selection:
Step 1: Detect the changed files
- Compare the latest commit in the PR with the master branch to generate a changed file list.

Step 2: Define a mapping between source files and tests to run when they are changed
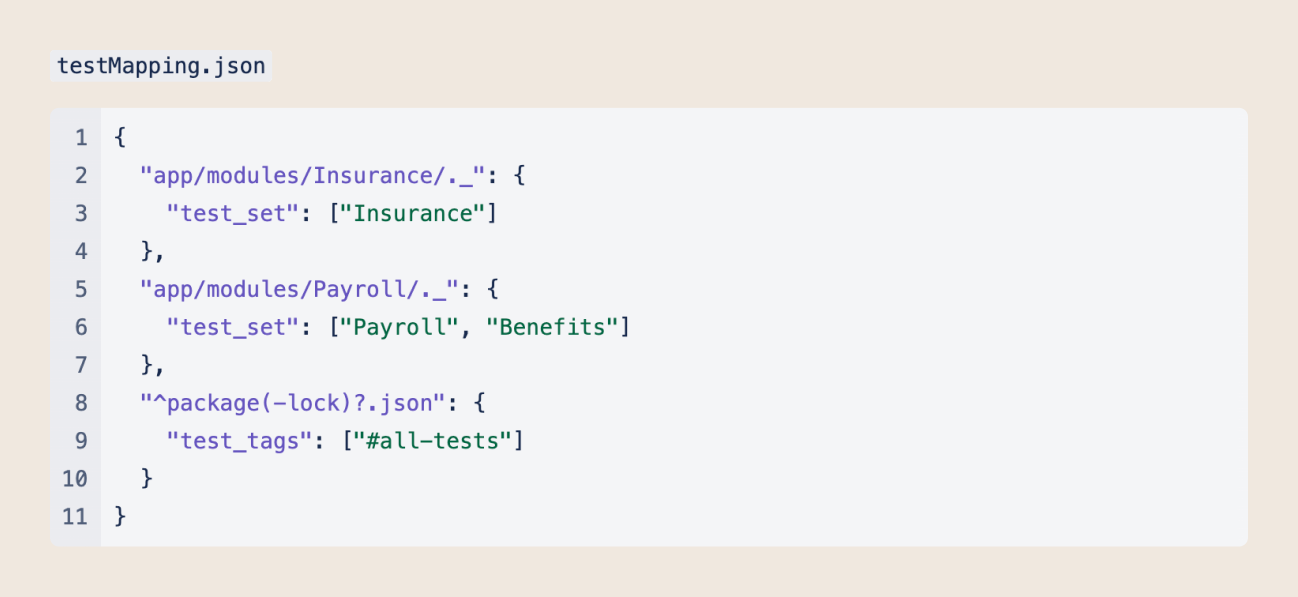
- A single JSON file, which contains all the mappings, is committed to our webapp repository and developers have complete control to define this mapping between tests and source files.
- Developers can add single or multiple test sets, or even choose to run the whole test suite, which may be the case for changes in configuration files like package.json.

Step 3: Generate the list of tests to run from the output of Step 1 and Step 2
- Matching file paths from Step 1 to the patterns from testMapping.json (above), we get the test sets to run as “Payroll” and “Benefits” which resolves to end-to-end-tests/modules/Payroll/**/*.test.ts and end-to-end-tests/modules/Benefits/**/*.test.ts.
- For running tests across modules, we support test tags (e.g. any changes made to the config files like package.json will trigger a run with all the tests and this is achieved through #all-tests tag)
- For a test to be selectable using tags, you need to comment on the test file with that tag (e.g #smoke at the top of the file). This is similar to how Playwright annotations work for individual tests.
Now we have the list of tests to run based on the changes made in the PR.
Batching of tests
Playwright supports sharding but we wanted to make batching more efficient.
How? Here’s an example:
- Let’s say we have three tests to run on two parallel processes:
- Test 1, which takes 5 minutes to run
- Test 2, which takes 3 minutes to run
- Test 3, which takes 1 minute to run.
- Now let’s distribute the tests across threads:
- Process 1 – Test 1 & 2 (5 + 3 minutes)
- Process 2 – Test 3 (1 minute)

The time taken for CI to complete is 8 minutes.
- But if we batch the tests efficiently in the following way:
- Process 1 – Test 1 (5 minutes)
- Process 2 – Test 2 & 3 (3 + 1 minutes)

The time taken for CI to complete is only 5 minutes. So, using the time taken for each test in the previous CI run, we use the Bin packing algorithm to efficiently batch the tests to optimize for time.
Seeding test data
Populating data in your application for testing is called seeding. Let’s say you want to test if an employee has permission to access a particular third-party app.
- Before you can run this test, you will need to:
- Create a company
- Finish onboarding and add an employee
- For example, test_admin_privileges@rippling.test
- Set the correct permissions for the employee
Instead of executing the above steps every time before running the test, we wanted the database to already have the admin_employee@rippling.test account with the necessary data saved, so the only step required to run the test would be signing in to admin_employee@rippling.test.
To achieve this, we created a separate workflow in the backend services (let’s call it “generate_seed_data”) which executes the above steps and created the admin_employee@rippling.test account.
Once we execute this workflow, we can perform a database dump and the output structure is saved in storage. This workflow needs to only run based on backend code changes and not before every E2E testing setup. So, while setting up frontend and backend services for running end-to-end tests, we will perform a database restore from the latest dump and then run the tests.For example, for MongoDB, database dump will be performed with mongodump and database restore with mongorestore commands.
Sample code
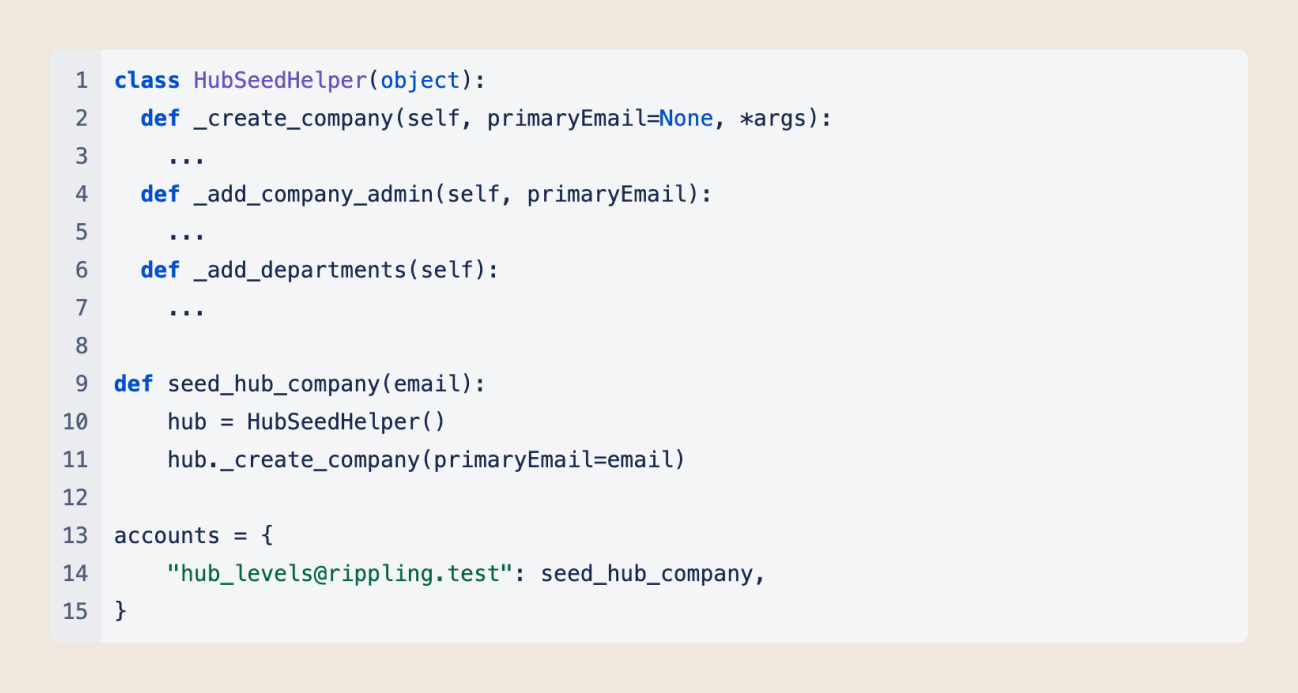
To create the pre-configured user account admin_employee@rippling.test, we need three files.
1. SeedHelper
1. SeedHelper class is owned and maintained by the product teams (at a module level ) like Insurance (InsuranceSeedHelper) and Payroll.
2. These primarily use the data models to expose methods to help construct the seed according to that particular module’s or test account’s requirements. So the base requirements for a seeded company in Payroll would not be the same as Insurance. So they maintain different SeedHelpers.

2. Recipes
1. A recipe uses the SeedHelpers to construct or extend the scope of the seed. Multiple seed helpers could be used in a recipe.
2. A recipe can be reused to create multiple companies with the same characteristics but different primary email addresses.
3. Accounts
1. Account files contain the list of accounts that needs to be created for the tests and also the recipe to be used to create them.
2. We can create multiple accounts using the same recipe if the specifications are the same.
Overview of the CI pipeline

Let’s look at a sample schematic of the CI pipeline with the discussed parts in action.
Deploy test environment
Once the code is checked out, we deploy the frontend web app and backend code after resetting the DB with the latest snapshot. We expose the WEBAPP_BASE_URL for the tests to run on.
Select and batch tests
Then, based on the files changed in the pull request, we select the relevant tests and, based on the previous test run durations, batch them. We can also add support for running smoke tests in this step to have more confidence in the stability of the build.
Build image and run tests
Next, we use the versioned official Playwright-Docker integration to build the image with the test code (you can also use Docker volumes and skip this step) and run all the test batches in parallel. Using the official docker image really helps us when upgrading Playwright in the codebase, as we don’t need to worry about the system dependencies to make it work.
Analyze and push reports, then notify stakeholders
Lastly, we analyze the test reports, push data to the reporting endpoint, and upload the artifacts (HTML report, video, trace and screenshot) to S3.
For analyzing the test outcomes, we built a custom Playwright reporter, which aggregated the test count by outcome and also provided the list of failed, flaky, and slow tests respectively.
Once the analysis is completed and we have the S3 URLs of the uploaded HTML report, we notify the developers via Slack and also leave a comment on the pull request.
Innovation along the way
We loved integrating Playwright into our engineering ecosystem so much that we wanted to give back to the Playwright OSS (open source) community. So we decided to open source a solution that we had built for our use case.
As we sharded the tests between multiple machines, we had separate HTML reports generated by each of them—and if there were test failures across machines, then devs would have to check separate reports.
- We wanted to merge these reports into a single one, but this feature was not available with Playwright.
- As a result, we wrote a custom solution that decoded and unzipped the test metadata from each report (index.html) and created a new single merged report, which was then shared with the developers.
- We open sourced the solution package we built on npm under the name Playwright-merge-html-reports (8000+ downloads weekly).
- It’s currently being used at elastic-charts and Vercel.
Interested in building platform-level solutions and tackling user and developer experience challenges? We’re hiring in San Francisco, Bangalore, New York, Seattle, and more. Take a look at our careers page!


